upcycled children’s room decorations

The beginning - wooden stars in “country Ugh” colors
I was coordinating donations for a craft table as part of a charity drive at work, recruiting as many volunteers as possible to submit an item or two to for the event. First of all, let me say that people are surprisingly creative. At work we often see only someone’s business side, and I REALLY enjoy learning that someone I’ve known for years knits or paints or sculpts in their free time. Plus it gives me non-work things to talk about with people at work (did I say that out loud?).
I was wandering through the “wood” aisle at my local thrift store when I came across this set of wooden star wall hangings. (Pardon the picture, I took these before I knew I’d be using them in a blog entry and would be showing everyone my dirty kitchen counter.)

A star for Harold….
I had to try to upcycle them somehow. I hated the colors, but they were small and cheap at $.99 each. Once I got them home, of course, I was thinking…Now what? So I brought one into work and involved all my coworkers in an upcycling “brainstorming” session. After throwing around a lot of ideas, “we” decided I should turn them into children’s decorations, each themed around a single book character.
So this is what I did:
Back to the thrift store to find children’s books. Final choices: Harold and the Purple Crayon, The Cat in the Hat and Curious George.
Sanded the stars down to get most of the paint and random gook off.
Primered them with gesso.
Cut out a bunch of images from the books.
Decided on a color for the edges, coordinated with each book’s color theme.
Actually doing the work turned out to be relatively easy, although time consuming. First, I mixed my own acrylic paint colors for the trim. It wasn’t super difficult, but it did take a while to get JUST the right yellow, green and blue. I never realized how distinctive those colors are, nor how strongly they’re tied to each author’s book character!
I also spent some time trialing the images on the stars to create a visually pleasing arrangement, with some characters facing up, some down, left, right, etc. In Harold’s case, I also practiced some stylized drawings to add to his themed star.
Once I had all the images arranged, I glued them with matte medium, let them dry, and hand drew the markings on Harold’s star. I also painted the back of the stars a basic black.
Finally, I covered each star in matte medium to give it a more consistent look since acrylic paint tends toward glossy.
I was very pleased with the final results, which I sold as a set for $35. Once hung on a wall, they could be used to hold a small item like a photo frame, candle, memento, etc.
I really enjoyed the entire process, especially turning something dirty and ugly into something cute. I was so glad to see them match my original vision. In fact, they turned out better than I had hoped. Plus, they received a lot of compliments and it’s always nice to know that other people appreciate your effort.
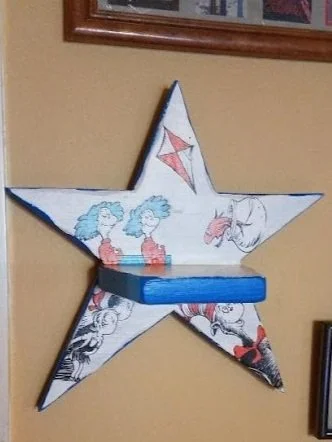
That blue is so hard to mix….

All three stars upcycled. So. Much. Better!